Automation to run VMs based on vanilla Cloud Images on Firecracker
This blog post is a part of a series of posts devoted to Firecracker automation. Currently it consists of the following posts:
- Part I (current)
- Part II: 63-Node EKS Cluster running on a Single Instance with Firecracker
Why some Firecracker automation would be helpful
Firecracker is a lightweight VMM (Virtual Machine Monitor), a VM “controller” layered on top of KVM, created an open sourced by AWS. The virtual machine runs as a process in your host OS, and is designed for simplicity and security. This post is not about Firecracker itself, but if you are not familiar with it I recommend diving deeper.
Because of its simplicity, it only supports virtualizing Linux, and starting a VM requires handing to Firecracker a root filesystem image and the kernel in uncompressed format. When using Firecracker you often times find yourself using the sample Linux kernel and root filesystem images on Firecracker’s GitHub “getting started”, or building your own.
Firecracker is started as a process per VM, typically listening on a file-based socket for HTTP requests to its API for configuration and VM lifecycle operations. Passing all the required configuration becomes a bit tedious and is a great candidate for scripting.
Besides, it would be ideal to run vanilla cloud images, as produced by the different distros, on Firecracker. This is possible and was enabled when initrd support was added. Still, you need to download the cloud image and modify it to potentially add SSH keys, change the default user’s password, configure the network, etc.
At the end of the day, both configuring and starting Firecracker, and preparing the cloud images to connect and use them, requires a fair amount of effort. The main goal of this post is to show some automation for these tasks, and offer a simple way to run cloud images, as provided. Key to this automation will be the use of cloud-init, a pervasive initialization software that is included in most cloud images, allowing to configure the image on first boot, based on provided metadata.
The architecture
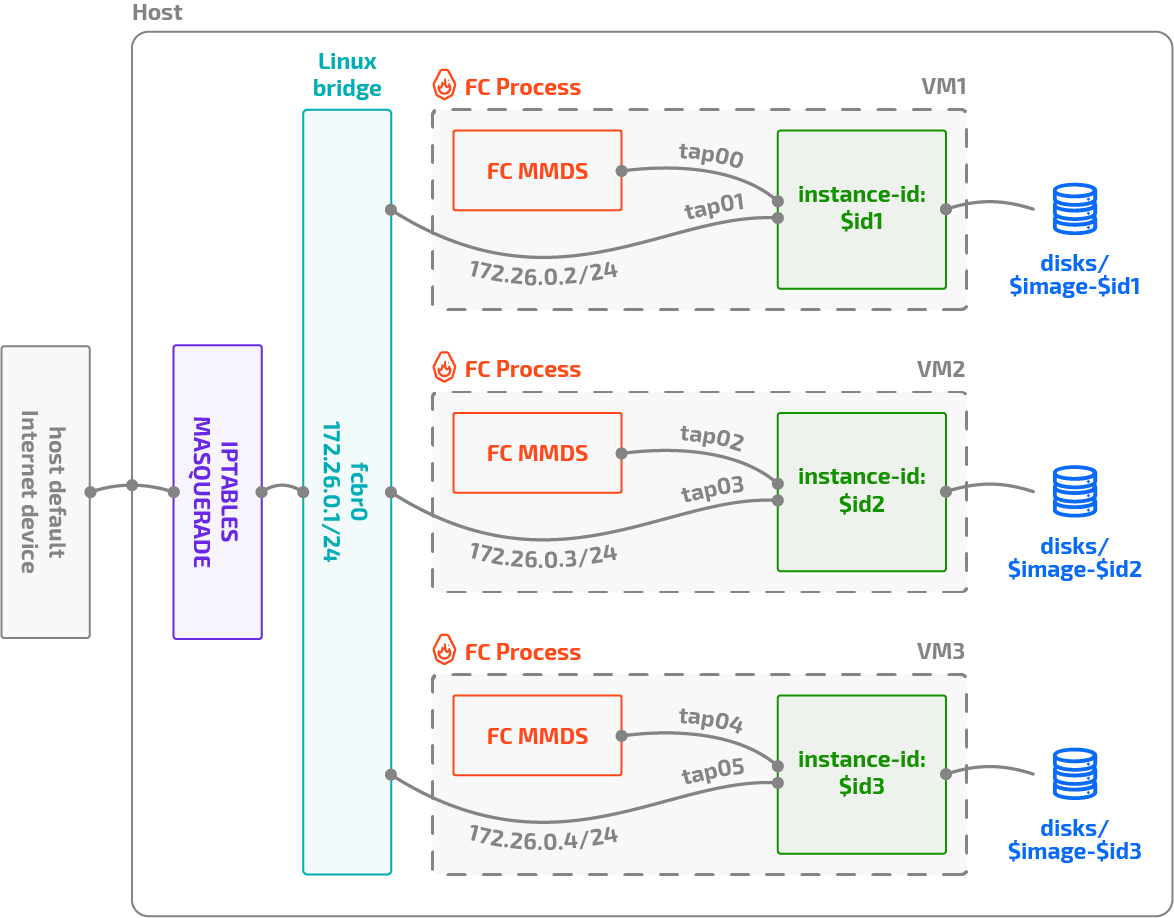
The created automation should be good to launch multiple VMs. Multiple Firecracker processes will be then needed (one for each VM), and one socket file for each too (for Firecracker’s API to listen to our commands and launch the VMs). Then, we will need one “disk” for each VM. A disk for a Firecracker VM is just a file on the host OS containing the root filesystem. So it will suffice to download the cloud image, make some minor scripted adjustments to it (more on this later) and then use it as a template –basically, copy the root filesystem to the file that the VM will effectively use.
What about networking? Firecracker allows you to specify a tap device to be passed to the VM. These tap devices will
then have one endpoint on the VM and another one on the host, allowing the network traffic to flow. In order for the host
OS to communicate with the VMs, and the VMs to communicate among each other, a Linux bridge will be used, where all the
host endpoints of the tap devices will be connected. The bridge will have its own IP on the same network (enabling host
processes to reach the network on the VMs), and then will be MASQUERADEd via iptables to allow the VMs to reach the
Internet.
Additionally, a second tap device will be added to the VMs. It will not be connected anywhere on the host or be given
any IP address on the host. This tap device will also have the special Firecracker property allow_mmds_requests, which
enables communications from the guest VM to the HTTP metadata endpoint to access Firecracker’s
metadata service (MMDS).
This metadata service is what will be used to provide the necessary information for the VM to configure itself on first
boot. The MMDS could have been enabled just on the main tap interface; but both for performance and security reasons,
it is better to have a separate tap device just to access MMDS.
This is how the complete architecture looks like:
cloud-init
Key to all the process is cloud-init. It is installed by default on most cloud images, and runs on first boot,
configuring the VM. cloud-init supports several methods (“sources”) from where to feed the necessary metadata on how
to configure the instance. Here I will be using one called
nocloud-net, which is specific for
on-prem environments. It supports fetching all the metadata from an HTTP endpoint, which is a perfect match for
Firecracker’s MMDS service. It will suffice then to write the cloud-init necessary metadata from the host to
Firecracker’s MMDS service via its API, and the guest VM will connect to the URL provided as the seed for nocloud-net
cloud-init datasource, and fetch it. Configuring nocloud-net can be easily achieved by passing to Firecracker’s boot
source configuration the following additional Linux kernel command line argument:
ds=nocloud-net;s=http://169.254.169.254/latest/
(see
conf/firecracker/boot-source.json).
Here 169.254.169.254 is the address where by default the MMDS service is accessible from the guest (can be changed via
Firecracker’s API if desired) and /latest is part of cloud-init’s API when accessing metadata (more precisely, it’s
a versioning field).
But how do we connect to the metadata IP service? We should firstly configure the network, in particular the tap device
that would be configured for MMDS access. Fortunately, we can also pass a network configuration via a kernel command line
argument (network-config), from where it will be read by cloud-init. It must be a
Networking Config Version 2
YAML file, base64 encoded (can also be gzip’ed before encoding –used here). The applied configuration will be
derived from the file
conf/cloud-init/network_config.yaml.
Upon boot, cloud-init will then read the kernel command-line arguments explained, and will configure eth0 inside the
VM, the device that is allowed to communicate with the MMDS API, with an IP able to access the MMDS range; and eth1
with an IP in the range of the internal network of the VMs. Remember that eth0’s host tap endpoint is not connected
anywhere, while eth1s host tap endpoint is connected to the bridge (and NAT-ed). Note that because of this, the IP
address of the eth0 device can be made the same on all VMs.
Once the network is configured, it will follow the nocloud-net datasource configuration, and connect to the HTTP
endpoint, accesible from eth0. According to cloud-init, it will need to fetch two files from the metadata service:
-
meta-data. It serves to perform instance configuration. Here only will be used to set the instance id and configure the hostname.
-
user-data. Probably known to many (as you can pass this on most cloud environments), is used to perform package installation, user configuration and many other actions on instance’s first boot. Here, it is used as a cloud-config script, one of the several possible options to initialize the instance provided by cloud-init. In particular, it is used to create the
fcuser, add it to password-less sudo, and set the SSH authorized key to an SSH pubkey, part of a key-pair previously generated on the host.
Thanks to this process, once the VM is booted, it will have its network configured and will be accessible from the host (thanks to the IP assigned to the bridge) via password-less SSH and with sudo permissions. Just like your regular EC2 instace!
Automation steps
All the automation has been written on a series of –a bit hackish– shell scripts. They are only intended for demonstration purposes, and definitely have a lot of room for improvement. All the source code is publicly available.
To use the automation, please review first the README.md file and see if you want to modify any values in variables.
Note that this will only run on a bare metal Linux system or a Linux VM with support for nested KVM virtualization.
Follow the next steps:
- Download Firecracker and set permissions for your user to access the
/dev/kvmspecial device. See Getting Started with Firecracker for more information.
sudo setfacl -m u:${USER}:rw /dev/kvm
[ $(stat -c "%G" /dev/kvm) = kvm ] && sudo usermod -aG kvm ${USER}
-
01-setup_host.sh. This script creates the host bridge where all VMs will be connected and creates the
iptablesrules to NAT outgoing traffic from the VMs to Internet. Modify the$EGRESS_IFACEvariable if the device would not be correctly detected. -
02-gen_keypair.sh. Generates the SSH keypair. The private key will be kept on the host to SSH the VMs. The public key will be inserted into the
authorized_keysof thefcuser in all VMs. Note that the more modern and secure EdDSA keys have been used. -
03-download_generate_image.sh. All the user configuration will be performed via cloud-init. However, because of how Firecracker works, cloud image as downloaded cannot be used directly. First of all, Firecracker doesn’t use a disk image with partitions, but just the root filesystem. Also, the kernel and initrd need to be provided separately (as Firecracker doesn’t support system emulation for bootloaders). Finally, the kernel image cannot be compressed. This script just downloads a
.tar.xz-ed cloud image, copies it into anext4filesystem backed by a file, downloads the initrd and kernel, and uncompresses the kernel. -
04-launch_vms.sh. The main script, that launches N virtual machines. It launches one Firecracker process per VM, proceeds to configure the VM and the metadata via Firecracker’s HTTP API, and finally boots into it. Note that several requests are needed to configure all the elements of the VM, including: instance configuration (CPU, RAM), disk devices, net devices, boot source and of course the metadata that will be used by cloud-init. All configuration used can be found in the conf/ directory.
-
Finally, some other scripts are available for cleanup. Please note that they will delete by default not only the disks of the VMs, but also the downloaded images and even key pairs.
Once you launch the VMs, you should get an output similar to:
$ ./04-launch_vms.sh
Started Firecracker with pid=63249, logs: /tmp/.id-14533-12478.log
Instace id-14533-12478 started. SSH with ssh -i keypairs/kp fc@172.26.0.2

Started Firecracker with pid=63561, logs: /tmp/.id-3522-29474.log
Instace id-3522-29474 started. SSH with ssh -i keypairs/kp fc@172.26.0.3

Started Firecracker with pid=63969, logs: /tmp/.id-3900-27804.log
Instace id-3900-27804 started. SSH with ssh -i keypairs/kp fc@172.26.0.4

Started Firecracker with pid=64435, logs: /tmp/.id-3526-18108.log
Instace id-3526-18108 started. SSH with ssh -i keypairs/kp fc@172.26.0.5
Final remarks
During the process, I came up with some questions, mostly for the Firecracker and cloud-init communities. Feel free to drop some comments if you have an opinion!
-
Firecracker: it would be great to think of a “Firecracker” image format that could group the uncompressed (or bzImage) kernel image, the initrd (optional) and the root filesystem (plus metadata about the image). Also it would be great if a tap device would not be necessary to connect to the MMDS service.
-
cloud-init. I was unable to configure the network via passing the network configuration as part of the metadata. I believe this is not possible with
noclouddatasource. While surprising, it still makes sense to do this even if usingnocloud-net, as a device to access the metadata could have been setup via kernel command line argument, and then expect to configure the rest of the interfaces through the metadata service. You can do this with other datasources (e.g.Ec2).
This post and the referenced source code should allow you to easily use Firecracker, and use a wide catalog of pre-built OS images, without having to go through several and tedious steps. Being these VMs so lightweight and fast to start, this setup is convenient for quickly fire VMs on your local environment (i.e. laptop) for quick experimentation. Moreover, Firecracker allows you to overprovision CPUs, so you can launch more VM cores than you really have.
Enjoy the ride!